Writing posts will resume sometime after this house recovers from a nasty flu bug and is able to get out of bed again...
Monday, January 19, 2015
Tuesday, January 13, 2015
What do you want to know?

One thing that has really amazed me, is the huge interest in tiny houses and info around the issues with going off grid in one. This blog has only been live now for about two months and has had nearly 60,000 visitors. That's a lot of people! I'm curious about what you all are most curious about? I started this blog to try to answer for others, some of the things I had a hard time finding much info on, and have now been learning about first hand. So I would genuinely like to know what everyone thinks would be most helpful.
Comment below with the question(s) you would most like to have answered, and I will try to write about that in the near future if it's something I have any experience with. Writing these posts does take some significant amount of time, but if people are finding it useful, I would very much like to continue. Comment away folks!
Monday, January 12, 2015
Fy Nyth's new sink

Due to a mixup, my house arrived with the wrong sink. (The builders have been great about covering everything with remedying this.) I cook a lot, and use my sink frequently as a result. And only having one basin is a problem. Finally the new one is in place. Above is the original one, and below is the hole once it was pulled out.


The new sink waiting to go in, and the enlarged hole ready to receive it.


Making space to add the second drain for the second sink basin.

Working at getting it to fit snugly.

It's in!

Getting the plumbing to line up and drain properly.

And the finished result.

It's been filled many times already, and clean up and dish washing are much more convenient. I love it! I'm sure it will continued to be used heavily and on a daily basis. Plus by observing I was able to learn a lot about how a sink is installed. More things I didn't know.

Friday, January 9, 2015
Fy Nyth's Composting Toilet

What do you do for a toilet when you are off grid? How does a composting toilet work? Isn't it gross? Does it smell? Isn't that weird? Etc.
Like most people who have one, this is something I get asked more questions about than almost anything other single thing. My toilet. So hey, if discussions about things like poop scare you, stop reading right now. On the other hand, it's something we all create daily and most of us spend very little time thinking about what happens to it afterwards so reading on may be worth your time.
There are several levels of complexity to composting toilets. Basically they all allow you to turn your waste into something useful or at the very least, non toxic. This is opposed to a flush toilet that uses a lot of good water and creates sewage. The simplest composting toilet is something like a seat over a 5 gallon bucket to which you add a handful of sawdust after each use and empty as needed. This is certainly the least expensive option. Then there are the manufactured ones that for the most part add a way to separate the liquids and solids. Keeping those two separate is very helpful in eliminating odors. These also move you from the price range of free or a few dollars to about $1000 for the least expensive model.
My toilet is a Natures Head, one of the least expensive of the more expensive models. So far at least, I really like it. Here's the basics of how it works. As you can see from the above photo, looking down on it, there is not a lot of difference in appearance from any other toilet you are used to. Below is a shot with the seat up. Looks kind of like an RV or airplane toilet inside to me. But nothing gross or weird.
The seat is comfortable and you sit down just like on any toilet seat. If you just need to pee, do so and it will all drain into the liquids tank. I hear if you are a guy it is easier to do this sitting down just because of the splash likelihood with the hard plastic sides. Now being a woman, I don't have personal experience with this, but I hear that if you don't mind a quick wipe up afterwards, you can feel free to stand too.

If a number two is on the way, after sitting down, flip that little handle you see on the righthand side above. This will open the trap door, which you can see below. Almost anywhere you can comfortable sit, this will direct anything solid right down into the solids tank. What if you do both at the same time? Unless you are scooted way forward or backward on the seat, both liquids and solids should still end up in their respective containers. There is a potential I have found for a few drops of pee to drip into the open trap door though. This I do try to avoid as getting the two together makes a smelly combo. Shifting just slightly on the seat fixes this and will soon require no thought at all.

This is after more than a month of solid use, and while you can't see into the tank real well, it's like that in person too. Just looks like a pile of dirt and has a slight earthy smell if you are trying to sniff it. Similar to getting your nose close to the potting soil in any of my house plants. Not strong or in any way unpleasant, even with the trap open and while trying to sniff for odors.
The spray bottle has water with a little vinegar in it. A spritz or two into the bowl when you are done helps keep everything nice and fresh. The spray bottle pictured here was a dollar store one, but did not always spray well. I now have one that will spray while held in any position including upside down, and that is kind of handy.
Can you put items X, Y, and Z in here? Yes, you can put anything in there. But some things won't decompose or at least won't do so quickly. Feminine products I still put in the trash just as I would when using a flush toilet. Toilet paper can all go in there, but just because I'm a girl and use more than most guys would, and I don't want to fill it up too quickly, I have started putting most of it in the trash. I go by a rule I heard from someone else. If you need to open the trap door for anything, then the paper goes in there. Otherwise, it goes in my little sealed trash can (it was sold as a holder for spare toilet paper but makes a great little trash can with a lid for a tiny bathroom) which is obviously not far away.


Here you can see the liquids tank. It's close to needing emptied in this shot. Do pay attention and empty it before it's full to the brim. Twice now I've kind of forgotten about it and while it doesn't leak thanks to that seal, when you do empty it, you'll have to clean up the overflow. Which should all be contained in the bin the tank is sitting inside. But still, empty it before it's overflowing, and life will be easier. ;)
As far as where everything ends up? Diluted urine is a great fertilizer. If you live in the middle of a city, there may be issues with this, but in a rural area, water your landscaping with it. I haven't had to empty the solids tank yet after almost two months of use, mostly by just one person. And it's not looking like I will need to for a few months. But when I do, I plan to start a larger outdoor composting bin to finish it off and eventually use with plants as well.
Well that's all the info I can think of off the top of my head. Feel free to comment with any more questions and I will do my best to respond.
In case you are interested in a similar set up for your tiny house or RV, following are links to some of the items I use and describe in this post. If you buy them through my link, you will be helping me pay the bills here in my tiny house!
Thursday, January 8, 2015
Heat wave!

Less than a week after my last post, and at about the same time of night, this is what my thermometer read. That's nearly 50 degree temperature swing! And had I taken shots during mid day, it would have appeared to be almost a 70 degree swing. The warmer weather is nice, but I didn't really want it to get above freezing and make everything sloppy.
Below is a visitor I had yesterday.

Tuesday, January 6, 2015
Off grid water in my tiny house

Yes my house has plumbing, running water, hot water, all those things you'd expect in any house. The difference is how the water gets there for me. All of those things only have water to run and heat if there is water in my internal 26 gallon tank that hides under part of the kitchen counter. This could be filled easily and constantly by hooking it to a standard garden hose. And this would be great if I lived near a garden hose and if it wasn't way below freezing for much of the year. As it is, my tank only has water if I put it in there. So here's how my system works.
Those two jugs you see above, which have now actually been expanded to four just to make my trips more efficient, are the core of getting water into my tank. A friend has a well with great water about a mile up the road from me. So, when my tank is running low, or the weather is warm making the job a little easier, I load up my jugs and drive over. These jugs are pretty sturdy, but they have been abused a bit over their life so they do leak a bit around the vents if I fill them the whole way and then hit some bumps while driving back. So positioning them to hang over the floor board there is on purpose to keep my carpet dry.

This is where you add water to the tank from the outside of the house. The closed one is for the easy hose hook up if you have that option. The open one is what I use. You can also just see a little third hole, this is where the water starts to overflow back out of the tank if you try to keep putting more water in after it is already full.
As you can see below, sometimes a little water puddle will freeze right in the bottom of the trap but it is always easy to pop out with something like a screwdriver.

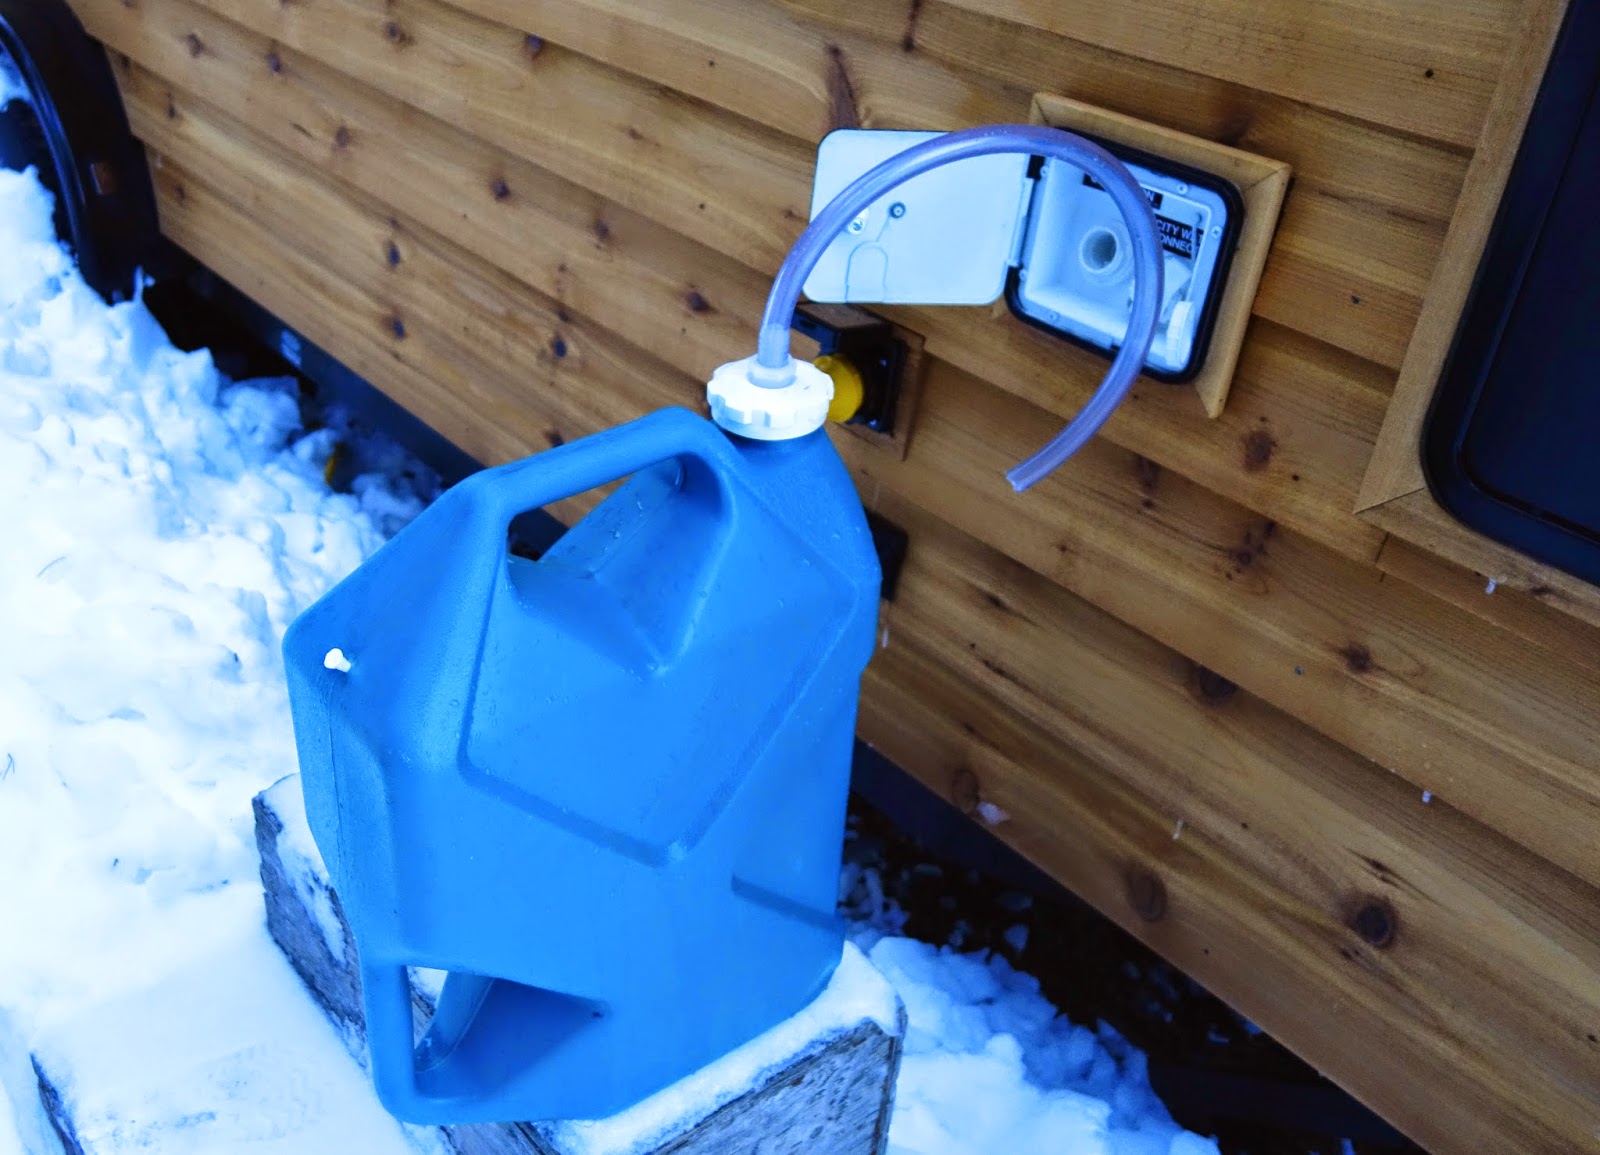
This is my hose set up that allows me to pour water right from my jugs and get around the uphill trap in the plumbing going into my water tank. The white part of the lid is the standard setup for these Reliance jugs and they have a threaded hole in the center for a spigot. I simply took that out and threaded in a hose fitting. I think this one is a 1 inch on the threaded side and goes to a 3/4 inch on the hose side. Then it was easy to just push about 18 inches of flexible hose onto that fitting. It seems to be an easier set up that trying to find a funnel with some kind of flexible end that can get around the trap.


Now all I have to do is shove that hose into the pipe until it's far enough in to be over the uphill part and drain into the tank instead of back outside and on to the ground.

And then stand on the nice little old mounting block, prop the jug on my knee, and wait for it to empty. Oh, and repeat this three more times if I am trying to go from an empty tank to a totally full one. None of which is really hard, but it does take some time, and kinda sucks when it's way below zero outside.


Inside, I also have a water jug like this that I use for things like filling glasses to drink from or any other little thing that only needs room temperature water. This keeps my (relatively high power use) water pump from needing to run as much. If you are building your own place with a water tank like this, I'd recommend putting the tank just high enough to gravity feed your plumping so you don't need a water pump at all. But this jug set up helps some with that in my house, and if I ever spill anything, it's positioned right over the sink where it shouldn't be a problem at all.

This amount of work does make one very conscious of your own water use, much more than I ever was when living just hooked up to an apparently unlimited water supply. I seem to average about 140 gallons of water a month here at my house. That covers all my cooking, dish and hair washing, watering plants, etc. I do usually shower at the gym and my toilet is a composting one, so it uses no water. This is about the same amount that the average American uses per day, so I know this system has made me much more careful with how I use water. Before, I could not have told you how many gallons I used a month, as I have no idea. But it was more that 140 I am sure.
In case you are interested in a similar set up for your tiny house or RV, following are links to some of the items I use and describe in this post. If you buy them through my link, you will be helping me pay the bills here in my tiny house!
Wednesday, December 31, 2014
New Years Party

So how did you celebrate the arrival of the new year in your tiny house? Well, to sound totally deprived and backward, by sitting around and watching batteries charge. I know, I know, that sounds much like watching paint dry. It kind of is. But really, it's very exciting when you have just doubled the size of your battery bank, your generator is newly repaired (thanks to a friend with some amazing skills), the batteries are almost topped off, and it's nearly 70 degrees in your house while it's 20 something below zero outside. Way more fun than watching a ball drop or anything like that. So that's my new years party, hope yours was as exciting and useful!

That 620 amp hours of stored power now folks! Pretty exciting.

And even though my house is comfy and warm, these temps are really showing how much moisture there was in the air. When all that ice melts again, I'm going to have some mopping up to do.

Friday, December 26, 2014
What would I do different?

It's after Christmas now and tomorrow I'll have lived in my house for a month. And I love it here, this post is not at all about not liking a tiny house or my tiny house in particular. This is just a list of things that I would change if I had them to do over again. Because maybe thinking about some of them will help the next one of you that is building or designing your house make choices you are happy with. Many of these things relate to learning more about living off grid efficiently.
1. I would have picked a heater that would operate even with no electrical power at all. I like my Suburban propane heater, it does a great job, doesn't burn too much propane, and provides a comfortable heat. (Though if I was planning to be on the grid, I would absolutely have chosen radiant floor heat because my feet have always tended to be cold. I knew from the start I wouldn't have a power system that could handle that though.) But I was unaware that my heater required electricity to start every time it kicks on, and will not operate if the fan is not running. This also requires power. I live in a cold area. It would be nice to know I could heat my house even if my electrical system fails for some reason. This may actually be something I change eventually, but that would require a good bit of work and remodeling.
2. I would have placed the water tank somewhere higher in the house. The water pump is one of the three biggest power hogs in my house, following the fridge which I planned on requiring the most power, and the heater which I did not realize used any electricity. But, my water tank only has water if I pour it in there from my water jugs. I have no external connection to any water source. And pouring it into a slightly higher tank would not be much more work. So if the tank was located higher in the house, like anywhere above the kitchen sink, gravity feed should work and I wouldn't need a water pump at all. Saving on having to buy and maintain a pump as well as the power it consumes. Now this could be more of a problem if I used my shower as a shower rather than a closet, but I don't. I haven't looked into how hard it would be to change the water tank location at this point, but I'm thinking not very easy.
3. I would have added a tiny bathtub. While I don't use my shower (and didn't use one much even living in a big house) and have for years since traveling just washed my hair in my sink, I do love soaking in a hot bath. And if I had one, would be willing to put in the extra work to haul water to fill it up and use it every now and then. This I may choose to add at some point as well.
4. I would have less windows. Not because I don't like windows, I love them, but I would prefer a smaller number and then make them all larger. Right now, my house has 16 windows. That's a lot! I think the views might be better out of a larger window and there would be less of them to work around as I place other things in the house. Also, a larger window would have cut down on the time and money required to create curtains or blinds for them. This is one that won't change unless I am building a whole new house, which seems unlikely.
5. On a simliar note, I would have skipped the little dividers that make the windows looks so homey and cute. A simple sheet of glass would be easier to clean for one thing. And again, I think I'd like the view better. But more importantly, I get a lot of condensation, especially when I am cooking, which is kind of all the time. And the extra strips of wood just serve to catch and condense more water giving me another spot that can get moldy and start to rot. Not that they are doing so yet, but I'm guessing it will happen sooner or later since they are always at least damp. Again, this isn't going to change unless I am replacing my windows, so not for a very long time if ever.
6. I would have bought a larger battery charger to use with my generator from the start. Being ignorant about all this stuff, I bought one sized for any single one of the batteries I have. Not realizing or thinking about the fact that when I wire two or four of my batteries together, I really have just one big battery that the charger is trying to fill. So it works, but requires me to run the generator longer as it can't dump enough power into the battery bank fast enough. A new, larger one has already been purchased.
7. I'd have skipped the corner porch. Again, not that I don't like porches, but I live in an area where it is winter for much of the year. So there is very little time when I would do anything like hang out on my porch. If the weather's nice, I have thousands of square miles of wilderness right outside my door to hang out in. I wish I'd made that little corner into a mud room or some kind of inside spot to hang coats, take off boots, and leave the snow and water a little more out of the main living area of the house. Maybe sometime in the future I will wall the porch in and create something like that.
That's my conclusions from the first month of living here guys! Actually, I arrived at most of those conclusions in the first week, but didn't get around to writing about them till now. I hope they help some of you as you design your own houses. And just in case anyone still wasn't clear..... I do love my little house despite this list.
Thursday, December 25, 2014
Where I Live

This is off the subject of all the details of my house it's self, but I thought some of you might enjoy a few shots from the general area where my house is parked. I really do love living here! This is a random collection of some of my favorite shots I've accumulated over a few years, all from pretty close to my house. Merry Christmas.


.jpg)


Subscribe to:
Posts (Atom)