Wednesday, January 21, 2015

Off grid laundry in a tiny house


So how do I do laundry? I have a tiny house, and am off grid, so space, water, and power are all limited. I think my parent's laundry room is larger than my whole house. How do I get clean clothes without lots of all those things?

There are several options for a tiny house. The closest to a "normal" washing machine would be any of the combination washer/driers that are designed for apartments and are non vented. I do have a good friend who has one and he has been using it happily for years. You can put your laundry in, turn it on, and forget about it. And I hear they are very gentle on clothing and generally a good deal. But, they do take up some space and still use power. On the other end of the spectrum, you can just wash things totally by hand. I suppose I could even get a washboard out and walk down to the creek beside my house to do my laundry. I did not go with either of these options however.

I have an hand crank washing machine, a Wonderwash, which I am very happy with.  It probably falls somewhere in the middle of the options listed above. It is pictured above, set up ready to drain into my sink. I was actually using this while I lived in a hotel before moving into Fy Nyth so I have had a while to obtain experience with this set up. I really like it, but it is not an electric washing machine that requires no involvement or thought. If that is want you are expecting, you will not like it. Using it also requires at least some turning, and for me lifting and carrying of water (due to my off grid water set up, when I was still living on grid, I just filled it in the tub and did not have to carry any water), all things within a basic level of physical ability, but if you have a hard time with any of those tasks, again, it's probably not for you. I'll explain further how I use it below.


For laundry detergent, I use soap nuts. They are totally natural (and work just fine in a regular washing machine as well, I have been using them for years now), biodegradable (important for my grey water's health), and non toxic. I've always had sensitive skin and most soaps really irritate it, but soap nuts are terrific. You can even eat them or the liquid, though you'll probably get a slightly upset stomach, so I don't recommend this. 


Most of the time I just put 5 or 6 nuts in a little bag like this, and toss them into my washing machine with my clothing. You can also make liquid soap with them however. Below you can see about 15 nuts boiling in a quart of water (you end up with less due to evaporation). I just boil them till the water had turned pretty brown and no more seems to be leaching out of the nuts. About 45 minutes? Then I strain out the pieces of nuts, and I have liquid detergent.


As the liquid cools, some solids will settle out like as you can see below. This is totally normal. The liquid soap will create some bubbles, but is not a bubbly as a commercial detergent. The liquid soap is a little more effective if you are using cold water to do your laundry. It's also great for washing dishes or anything else. The one thing to be aware of is that since this it totally natural and has no preservatives, it will spoil unlike a standard bottle of soap. I've found if I just leave it on the counter for about three weeks, it will start to mold on top. Usually this is no problem as I use it up faster than that. I'm planning to experiment with making the liquid into a shampoo at some point too...


Back to the washing machine. It's basically a large (well kinda small) barrel on a frame with a handle. Above you can see the drain spout inserted so the dirty water can drain into my sink. (Or your shower, or outside, or anywhere you want the water, like watering plants, especially if you are using no chemicals in your laundry.)

 You do have to do a small load, but at my house it's just me, so I can take time to do maybe two loads some afternoon every two weeks or so and that's sufficient. I can get a pair of jeans, cotton pants, and handful of tee shirts, and some socks and underwear all into one load. I am also not a terribly large person, so realistically there is just less fabric in my clothing than some people will have. If you are larger, you'll have to do more loads I imagine.


Here's my laundry pile at the start. Obviously you can separate colors, but since pretty much all my clothing is dark, I don't bother. I usually add some water to the bottom of the barrel first along with my bag of soap nuts. Then add clothing till it's just over half full, and finish filling with enough water to cover my clothing. If you stuff it too full, there is not enough room for the clothes to agitate and they will not end up as clean.


Now you turn the lid on and use the small handle to screw it down tight. This give you an air and water tight seal. Now you can start to spin your machine. I usually sit mine on the counter so it can drain into the sink and this also makes it a nice hight for me to turn comfortably. When I was using it in the hotel, I did the same thing in the bathtub and just sat on the edge to turn it. Also fairly comfortable. I think the instructions say something like 200 turns in each directions. What I actually do is this. I turn it maybe 20 times each way, and then I go do something else for a little. Often I am cooking at the same time so this works well. A few (5-15 minutes) later, I come back and give it another 20 turns each way. It seems that repeating this 4 or 5 times gives it plenty of time to soak, and enough agitation. 


Now I insert the drain and walk off to do something else while the dirty water drains down the sink. Usually catching some to water all my house plants first. When I was using it in a bathtub, I found it faster to just take the lid off and spin the whole tub upside down and drain it that way. 

Next I add more water and repeat the above process to rinse everything well. This sounds like a long list of stuff involved, but really, the way I do it while doing other projects around the house only involves a few minuets of actual attention. And everything really does get clean. Gym clothes, hiking clothing, everything I've tried comes out clean.


Now we go to my Nina Soft Spin Drier. This is electrical. It's not a drier that blows hot air, it's more like a giant salad spinner. And it really does spin out a ton of water. You can certainly wring everything out by hand but when I tried a side by side test, one sock from a pair in the spin drier, one by hand, etc, I found the items in the spin drier were totally dry about 10 hours sooner than the stuff I had wrung out by hand and that made it worth it for me to have the drier around taking up space. The stuff from the drier actually feels almost dry enough to wear when it comes out unless it is a very heavy fabric. 


You fill the drier with your dripping wet laundry and drop that pink thingy on the top. This keeps little stuff like a sock from spinning out and getting stuck between the spinner and the main body. I've  done this when I forgot to use the pink thing, and getting stuff out of that little gap is tough. You also want to be sure you stack the things into there in a balanced way of it will have a really hard time spinning smoothly. When turned on, it spins about 1200 rpm, and gets and amazing amount of water out of the clothing.


Before you start it, make sure you put some kind of container under the drain. Again, if you are able to use it in your tub or shower you can just let it drain right there. My bowl from my kitchen aid fits perfectly under there and holds the amount of water I generally get from a full drier of laundry. 


Next comes my handy rack. I find the fastest spot for drying everything is to put the whole rack in my bathroom since one third of all the heat is venting into that little space, plus it's out of my way. And then I can hang items I want on hangers on the shower curtain rod. It makes a full little bathroom for sure, but it works!


If I have a huge pile of stuff to dry (say you accidentally turn your shower on and soak all your clothing that is hanging in there...) I can extend my old curtain rod across the whole house, and hang everything in the living room. Much more in the way, but this works as well. 

So far I am very happy with this set up. But if I ever change my mind, or have more power, I could choose to install one of those apartment combo washer/driers and have a more conventional system.

In case you are interested in a similar set up for your tiny house or RV, following are links to some of the items I use and describe in this post. If you buy them through my link, you will be helping me pay the bills here in my tiny house!


Tuesday, January 20, 2015

Feeling much better


Well, I am finally out of bed and able to keep food in my stomach again. I don't go down sick very often, but that bug was nasty. To make matters worse, I got sick on a Friday night, and then while I was still in bed on Saturday, my heater decided to quit. Stop dead. Refuse to come on. In case you don't remember, I live in the western mountains, and it's cold here. The only thing that could have been worse about the timing would have been if it had also been way below zero, which thankfully it was not. The temps were hovering around freezing. 

Obviously no one was going to be able to repair it over the weekend, so I just drained all the water from my pipes and moved my sick self and my house plants to a very kinds friend's house for the weekend.

 On Monday I was able to contact the closest repair man authorized by the heater manufacturer (He's only a 7 hour drive away, each way, in the winter. Ahh the joys of living in the middle of nowhere.) and he made it out on Tuesday. The furnace is still under warranty and Tumbleweed was terrific about taking care of everything. They really have been a pleasure to work with and I would highly recommend their customer service on both sides of buying a house from them.

If you happen to be in the greater Yellowstone area and in need of work on a furnace, I also would highly recommend calling Marty of Park County RV, Inc. (1-866-627-4678). He is very helpful and knowledgeable. He showed up, pulled the furnace out of it's very tiny space with assistance from a good friend of mine, and got everything working again in short order. Now my house is nice and toasty again. I'm so glad there are people who know how to do all kinds of things I know nothing about!

Monday, January 19, 2015

Taking a break...

Writing posts will resume sometime after this house recovers from a nasty flu bug and is able to get out of bed again...

Tuesday, January 13, 2015

What do you want to know?


One thing that has really amazed me, is the huge interest in tiny houses and info around the issues with going off grid in one. This blog has only been live now for about two months and has had nearly 60,000 visitors. That's a lot of people! I'm curious about what you all are most curious about? I started this blog to try to answer for others, some of the things I had a hard time finding much info on,  and have now been learning about first hand. So I would genuinely like to know what everyone thinks would be most helpful.

Comment below with the question(s) you would most like to have answered, and I will try to write about that in the near future if it's something I have any experience with. Writing these posts does take some significant amount of time, but if people are finding it useful, I would very much like to continue. Comment away folks!

Monday, January 12, 2015

Fy Nyth's new sink


Due to a mixup, my house arrived with the wrong sink. (The builders have been great about covering everything with remedying this.) I cook a lot, and use my sink frequently as a result. And only having one basin is a problem. Finally the new one is in place. Above is the original one, and below is the hole once it was pulled out. 


The new sink waiting to go in, and the enlarged hole ready to receive it.


Making space to add the second drain for the second sink basin.


Working at getting it to fit snugly. 


It's in!


Getting the plumbing to line up and drain properly.


And the finished result.


It's been filled many times already, and clean up and dish washing are much more convenient. I love it! I'm sure it will continued to be used heavily and on a daily basis. Plus by observing I was able to learn a lot about how a sink is installed. More things I didn't know.


Friday, January 9, 2015

Fy Nyth's Composting Toilet


What do you do for a toilet when you are off grid? How does a composting toilet work? Isn't it gross?  Does it smell? Isn't that weird? Etc.

Like most people who have one, this is something I get asked more questions about than almost anything other single thing. My toilet. So hey, if discussions about things like poop scare you, stop reading right now. On the other hand, it's something we all create daily and most of us spend very little time thinking about what happens to it afterwards so reading on may be worth your time.

There are several levels of complexity to composting toilets. Basically they all allow you to turn your waste into something useful or at the very least, non toxic. This is opposed to a flush toilet that uses a lot of good water and creates sewage. The simplest composting toilet is something like a seat over a 5 gallon bucket to which you add a handful of sawdust after each use and empty as needed. This is certainly the least expensive option. Then there are the manufactured ones that for the most part add a way to separate the liquids and solids. Keeping those two separate is very helpful in eliminating odors. These also move you from the price range of free or a few dollars to about $1000 for the least expensive model. 

My toilet is a Natures Head, one of the least expensive of the more expensive models. So far at least, I really like it. Here's the basics of how it works. As you can see from the above photo, looking down on it, there is not a lot of difference in appearance from any other toilet you are used to. Below is a shot with the seat up. Looks kind of like an RV or airplane toilet inside to me. But nothing gross or weird. 

The seat is comfortable and you sit down just like on any toilet seat. If you just need to pee, do so and it will all drain into the liquids tank. I hear if you are a guy it is easier to do this sitting down just because of the splash likelihood with the hard plastic sides. Now being a woman, I don't have personal experience with this, but I hear that if you don't mind a quick wipe up afterwards, you can feel free to stand too.


If a number two is on the way, after sitting down, flip that little handle you see on the righthand side above. This will open the trap door, which you can see below. Almost anywhere you can comfortable sit, this will direct anything solid right down into the solids tank. What if you do both at the same time? Unless you are scooted way forward or backward on the seat, both liquids and solids should still end up in their respective containers. There is a potential I have found for a few drops of pee to drip into the open trap door though. This I do try to avoid as getting the two together makes a smelly combo. Shifting just slightly on the seat fixes this and will soon require no thought at all.


This is after more than a month of solid use, and while you can't see into the tank real well, it's like that in person too. Just looks like a pile of dirt and has a slight earthy smell if you are trying to sniff it. Similar to getting your nose close to the potting soil in any of my house plants. Not strong or in any way unpleasant, even with the trap open and while trying to sniff for odors.

The spray bottle has water with a little vinegar in it. A spritz or two into the bowl when you are done helps keep everything nice and fresh. The spray bottle pictured here was a dollar store one, but did not always spray well. I now have one that will spray while held in any position including upside down, and that is kind of handy.

Can you put items X, Y, and Z in here? Yes, you can put anything in there. But some things won't decompose or at least won't do so quickly. Feminine products I still put in the trash just as I would when using a flush toilet. Toilet paper can all go in there, but just because I'm a girl and use more than most guys would, and I don't want to fill it up too quickly, I have started putting most of it in the trash. I go by a rule I heard from someone else. If you need to open the trap door for anything, then the paper goes in there. Otherwise, it goes in my little sealed trash can (it was sold as a holder for spare toilet paper but makes a great little trash can with a lid for a tiny bathroom) which is obviously not far away.


Here you can see the liquids tank. It's close to needing emptied in this shot. Do pay attention and empty it before it's full to the brim. Twice now I've kind of forgotten about it and while it doesn't leak thanks to that seal, when you do empty it, you'll have to clean up the overflow. Which should all be contained in the bin the tank is sitting inside. But still, empty it before it's overflowing, and life will be easier. ;)

As far as where everything ends up? Diluted urine is a great fertilizer. If you live in the middle of a city, there may be issues with this, but in a rural area, water your landscaping with it. I haven't had to empty the solids tank yet after almost two months of use, mostly by just one person. And it's not looking like I will need to for a few months. But when I do, I plan to start a larger outdoor composting bin to finish it off and eventually use with plants as well.

Well that's all the info I can think of off the top of my head. Feel free to comment with any more questions and I will do my best to respond.


In case you are interested in a similar set up for your tiny house or RV, following are links to some of the items I use and describe in this post. If you buy them through my link, you will be helping me pay the bills here in my tiny house!

Thursday, January 8, 2015

Heat wave!


Less than a week after my last post, and at about the same time of night, this is what my thermometer read. That's nearly 50 degree temperature swing! And had I taken shots during mid day, it would have appeared to be almost a 70 degree swing. The warmer weather is nice, but I didn't really want it to get above freezing and make everything sloppy. 

Below is a visitor I had yesterday.


Tuesday, January 6, 2015

Off grid water in my tiny house


Yes my house has plumbing, running water, hot water, all those things you'd expect in any house. The difference is how the water gets there for me. All of those things only have water to run and heat if there is water in my internal 26 gallon tank that hides under part of the kitchen counter. This could be filled easily and constantly by hooking it to a standard garden hose. And this would be great if I lived near a garden hose and if it wasn't way below freezing for much of the year. As it is, my tank only has water if I put it in there. So here's how my system works.

Those two jugs you see above, which have now actually been expanded to four just to make my trips more efficient, are the core of getting water into my tank. A friend has a well with great water about a mile up the road from me. So, when my tank is running low, or the weather is warm making the job a little easier, I load up my jugs and drive over. These jugs are pretty sturdy, but they have been abused a bit over their life so they do leak a bit around the vents if I fill them the whole way and then hit some bumps while driving back. So positioning them to hang over the floor board there is on purpose to keep my carpet dry.


This is where you add water to the tank from the outside of the house. The closed one is for the easy hose hook up if you have that option. The open one is what I use. You can also just see a little third hole, this is where the water starts to overflow back out of the tank if you try to keep putting more water in after it is already full. 

As you can see below, sometimes a little water puddle will freeze right in the bottom of the trap but it is always easy to pop out with something like a screwdriver.


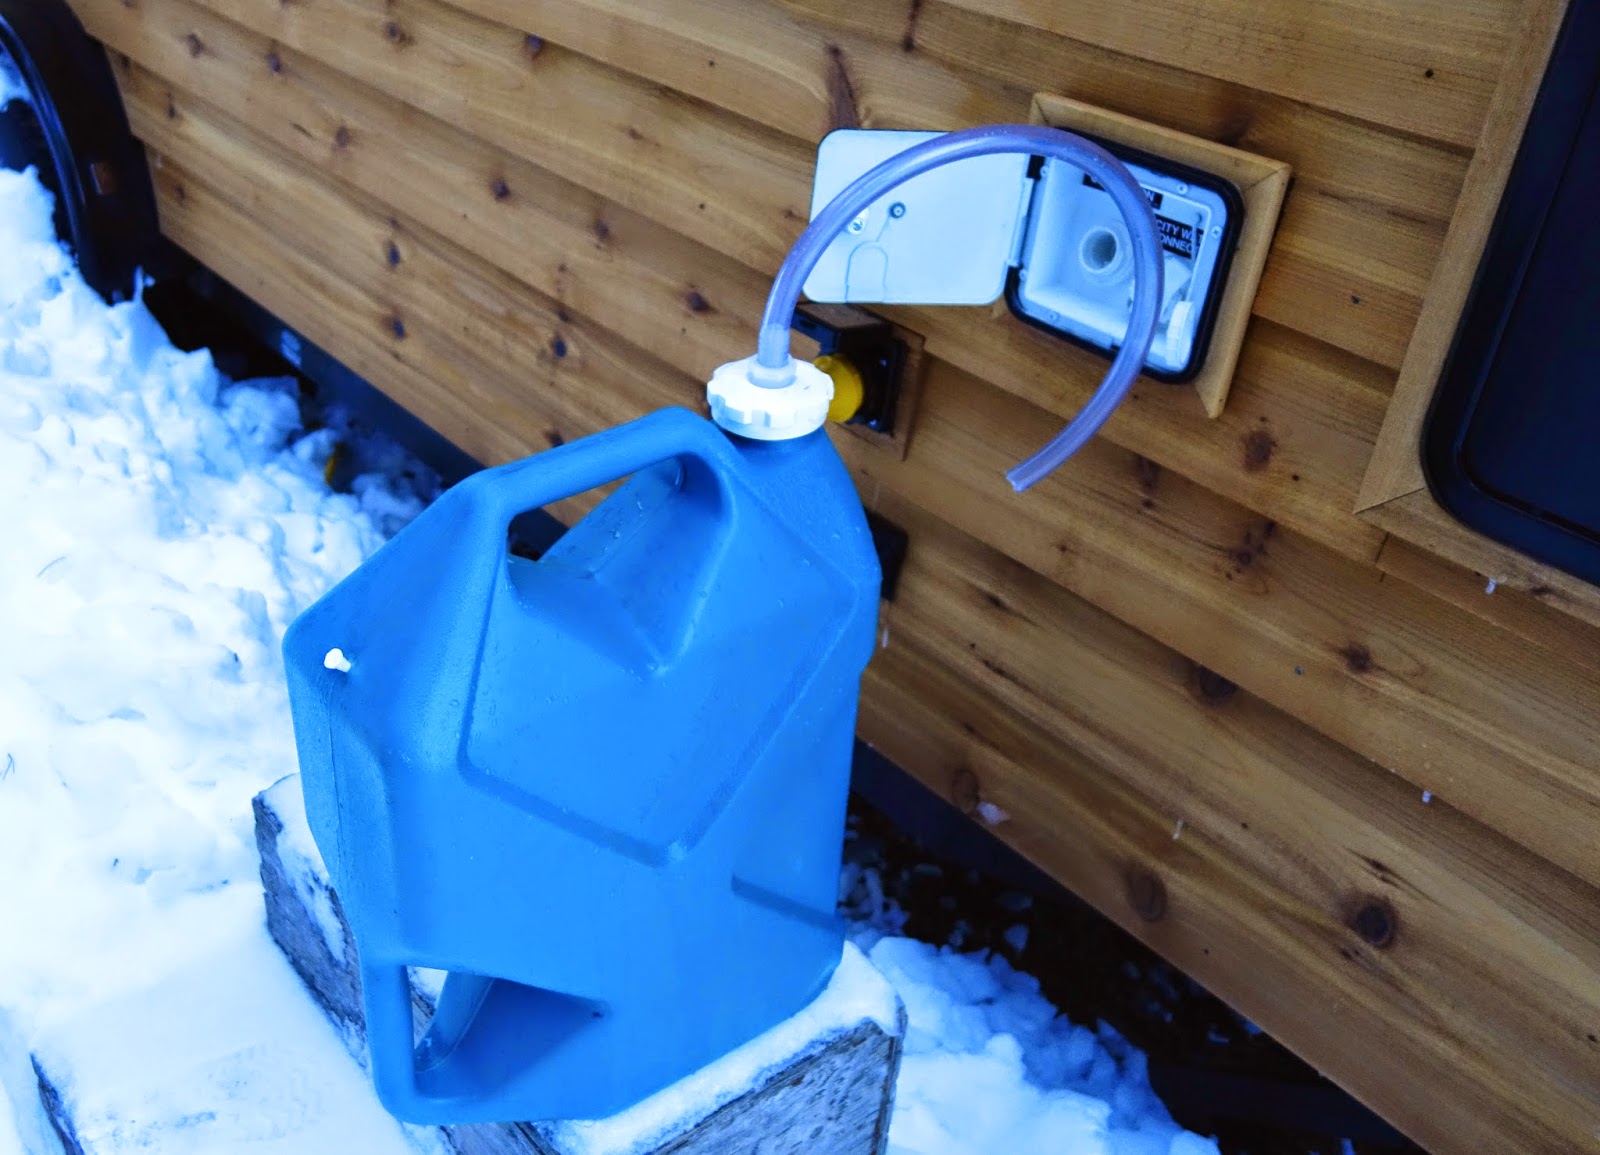
This is my hose set up that allows me to pour water right from my jugs and get around the uphill trap in the plumbing going into my water tank. The white part of the lid is the standard setup for these Reliance jugs and they have a threaded hole in the center for a spigot. I simply took that out and threaded in a hose fitting. I think this one is a 1 inch on the threaded side and goes to a 3/4 inch on the hose side. Then it was easy to just push about 18 inches of flexible hose onto that fitting. It seems to be an easier set up that trying to find a funnel with some kind of flexible end that can get around the trap.


Now all I have to do is shove that hose into the pipe until it's far enough in to be over the uphill part and drain into the tank instead of back outside and on to the ground. 


And then stand on the nice little old mounting block, prop the jug on my knee, and wait for it to empty. Oh, and repeat this three more times if I am trying to go from an empty tank to a totally full one. None of which is really hard, but it does take some time, and kinda sucks when it's way below zero outside.


Inside, I also have a water jug like this that I use for things like filling glasses to drink from or any other little thing that only needs room temperature water. This keeps my (relatively high power use) water pump from needing to run as much. If you are building your own place with a water tank like this, I'd recommend putting the tank just high enough to gravity feed your plumping so you don't need a water pump at all. But this jug set up helps some with that in my house, and if I ever spill anything, it's positioned right over the sink where it shouldn't be a problem at all. 


This amount of work does make one very conscious of your own water use, much more than I ever was when living just hooked up to an apparently unlimited water supply. I seem to average about 140 gallons of water a month here at my house. That covers all my cooking, dish and hair washing, watering plants, etc. I do usually shower at the gym and my toilet is a composting one, so it uses no water. This is about the same amount that the average American uses per day, so I know this system has made me much more careful with how I use water. Before, I could not have told you how many gallons I used a month, as I have no idea. But it was more that 140 I am sure.


In case you are interested in a similar set up for your tiny house or RV, following are links to some of the items I use and describe in this post. If you buy them through my link, you will be helping me pay the bills here in my tiny house!